Description
Everything you need to know about making a classic homemade pie crust with simple ingredients and step-by-step instructions for the best results every time.
Ingredients
Units
Scale
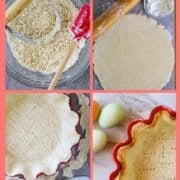
- 2 cups all-purpose flour, plus more for rolling
- 1 teaspoon salt
- 2/3 cup shortening
- 1/3 cup ice-cold water
Instructions
- Place flour and salt into a large bowl and stir together.
- Cut shortening into the flour using a fork or pastry blender cutter until the mixture forms pea-size balls.
- Stir in small amounts of water with a fork until the dough comes together; you may use more or less than 1/3 cup of water; see notes below.
- Knead the dough a few times, form it into a ball, place it on a flour-dusted countertop, or wrap it in plastic wrap and place it in the refrigerator for at least 30 minutes; refrigerating lessens the chance of the dough cracking when rolled out.
- Roll dough out on a flour-dusted countertop into a circle large enough to cover a nine-inch or smaller pie plate; this recipe makes 1 nine-inch pie.
- Fold in the dough, by one-thirds, toward the center of the crust to form a square.
- Place dough square into the center of the pie plate and gently unfold one side at a time to cover the sides of the pie plate, do not pull on the dough.
- Trim the ends of the dough evenly at the top edge of the pie plate or leave a 1-inch edge overhang to fold crust under all around the plate; see notes below.
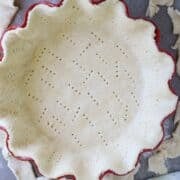
- Prick the crust with a fork, even up the sides, if you are baking the pie crust before filling it; see notes below.
- Cover the dough with parchment paper and fill the covered pie shell with raw rice, dried beans, or pie weights to keep the shell from bubbling and/or shrinking during baking.
- Bake at 450° F for 15 minutes, or use the pie crust for other fill and bake pie recipes.
- Store baked and cooled pie shell in the freezer for up to 1 month after covering with foil and placing in a zip-top gallon bag.


Notes
- Sometimes the dough needs more water if the shortening isn't cut enough into the flour.
- Too much water makes a gummy pie crust.
- Too much flour causes the dough to toughen.
- When covering pie pate, do not pull on the dough to wrap the sides of the pan, or the crust will shrink during baking.
- You can use a fork to crimp the top edges of the dough onto the pie plate or leave enough crust to turn it under and flute the edges with your fingers for a classic design; this keeps the edges from shrinking and sliding into the pie plate while it bakes.
- Prick the uncooked pie crust only when filling it after baking.
- Do not prick the unbaked crust if you are filling it before baking, or the filling will leak out during baking and leave a soggy crust.
- Double the recipe for pies topped with crust before baking.